9.7 KiB
| title | date | slug | url |
|---|---|---|---|
| Using Deployment objects with Kubernetes 1.2 | 2016-04-01 | using-deployment-objects-with | /blog/2016/04/Using-Deployment-Objects-With |
Editor's note: this is the seventh post in a series of in-depth posts on what's new in Kubernetes 1.2
Kubernetes has made deploying and managing applications very straightforward, with most actions a single API or command line away, including rolling out new applications, canary testing and upgrading. So why would we need Deployments?
Deployment objects automate deploying and rolling updating applications. Compared with kubectl rolling-update, Deployment API is much faster, is declarative, is implemented server-side and has more features (for example, you can rollback to any previous revision even after the rolling update is done).
In today’s blogpost, we’ll cover how to use Deployments to:
- Deploy/rollout an application
- Update the application declaratively and progressively, without a service outage
- Rollback to a previous revision, if something’s wrong when you’re deploying/updating the application

Without further ado, let’s start playing around with Deployments!
Getting started
If you want to try this example, basically you’ll need 3 things:
- A running Kubernetes cluster : If you don’t already have one, check the Getting Started guides for a list of solutions on a range of platforms, from your laptop, to VMs on a cloud provider, to a rack of bare metal servers.
- Kubectl, the Kubernetes CLI : If you see a URL response after running kubectl cluster-info, you’re ready to go. Otherwise, follow the instructions to install and configure kubectl; or the instructions for hosted solutions if you have a Google Container Engine cluster.
- The configuration files for this demo. If you choose not to run this example yourself, that’s okay. Just watch this video to see what’s going on in each step.
Diving in
The configuration files contain a static website. First, we want to start serving its static content. From the root of the Kubernetes repository, run:
$ kubectl proxy --www=docs/user-guide/update-demo/local/ &
Starting to serve on …
This runs a proxy on the default port 8001. You may now visit http://localhost:8001/static/ the demo website (and it should be a blank page for now). Now we want to run an app and show it on the website.
$ kubectl run update-demo
--image=gcr.io/google\_containers/update-demo:nautilus --port=80 -l name=update-demo

deployment “update-demo” created
This deploys 1 replica of an app with the image “update-demo:nautilus” and you can see it visually on http://localhost:8001/static/.1

The card showing on the website represents a Kubernetes pod, with the pod’s name (ID), status, image, and labels.
Getting bigger
Now we want more copies of this app!
$ kubectl scale deployment/update-demo --replicas=4
deployment "update-demo" scaled

Updating your application
How about updating the app?
 $ kubectl edit deployment/update-demo

 This opens up your default editor, and you can update the deployment on the fly. Find .spec.template.spec.containers[0].image and change nautilus to kitty. Save the file, and you’ll see:

 deployment "update-demo" edited
You’re now updating the image of this app from “update-demo:nautilus” to “update-demo:kitty”. Deployments allow you to update the app progressively, without a service outage.

After a while, you’ll find the update seems stuck. What happened?
Debugging your rollout
If you look closer, you’ll find that the pods with the new “kitty” tagged image stays pending. The Deployment automatically stops the rollout if it’s failing. Let’s look at one of the new pod to see what happened:
$ kubectl describe pod/update-demo-1326485872-a4key
Looking at the events of this pod, you’ll notice that Kubernetes failed to pull the image because the “kitty” tag wasn’t found:
Failed to pull image "gcr.io/google_containers/update-demo:kitty": Tag kitty not found in repository gcr.io/google_containers/update-demo
Rolling back
Ok, now we want to undo the changes and then take our time to figure out which image tag we should use.
$ kubectl rollout undo deployment/update-demo
deployment "update-demo" rolled back
Everything’s back to normal, phew!
To learn more about rollback, visit rolling back a Deployment.
Updating your application (for real)
After a while, we finally figure that the right image tag is “kitten”, instead of “kitty”. Now change .spec.template.spec.containers[0].image tag from “nautilus“ to “kitten“.
$ kubectl edit deployment/update-demo
deployment "update-demo" edited

Now you see there are 4 cute kittens on the demo website, which means we’ve updated the app successfully! If you want to know the magic behind this, look closer at the Deployment:
$ kubectl describe deployment/update-demo
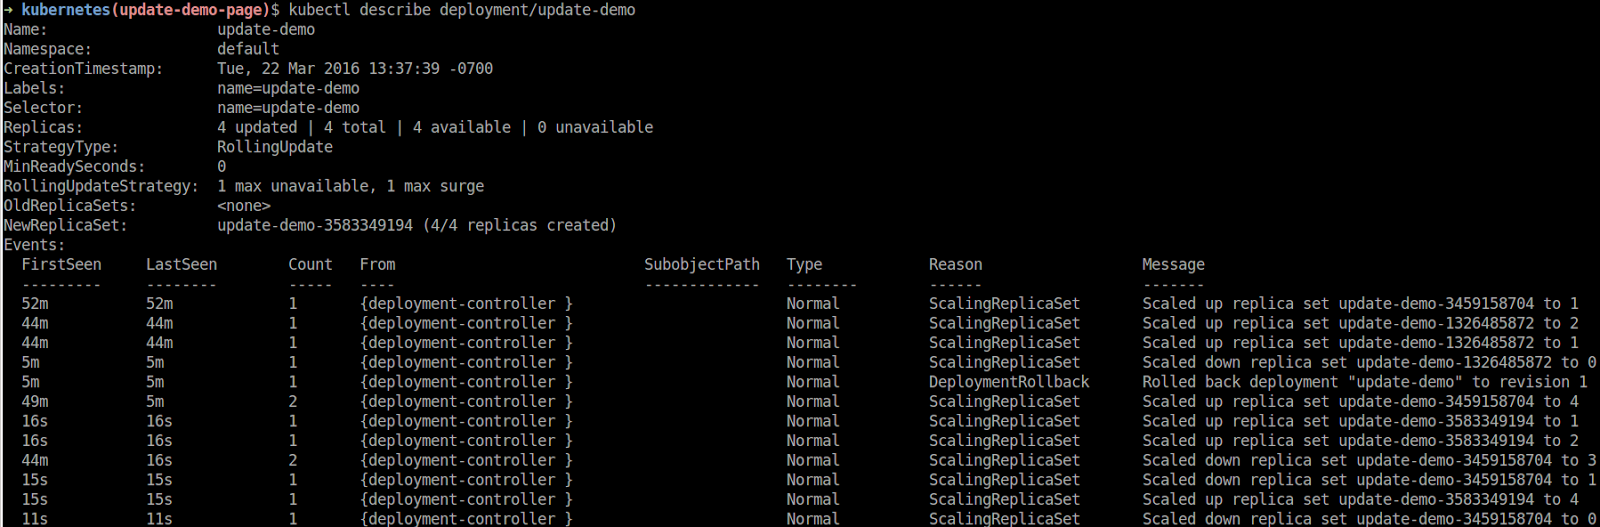
From the events section, you’ll find that the Deployment is managing another resource called Replica Set, each controls the number of replicas of a different pod template. The Deployment enables progressive rollout by scaling up and down Replica Sets of new and old pod templates.
Conclusion
Now, you’ve learned the basic use of Deployment objects:
- Deploy an app with a Deployment, using kubectl run
- Updating the app by updating the Deployment with kubectl edit
- Rolling back to a previously deployed app with kubectl rollout undo But there’s so much more in Deployment that this article didn’t cover! To discover more, continue reading Deployment’s introduction.
Note: In Kubernetes 1.2, Deployment (beta release) is now feature-complete and enabled by default. For those of you who have tried Deployment in Kubernetes 1.1, please delete all Deployment 1.1 resources (including the Replication Controllers and Pods they manage) before trying out Deployments in 1.2. This is necessary because we made some non-backward-compatible changes to the API.
If you’re interested in Kubernetes and configuration, you’ll want to participate in:
- Our Configuration slack channel
- Our Kubernetes Configuration Special Interest Group email list
- The Configuration “Special Interest Group,” which meets weekly on Wednesdays at 10am (10h00) Pacific Time at SIG-Config hangout And of course for more information about the project in general, go to www.kubernetes.io.
-- Janet Kuo, Software Engineer, Google
1 “kubectl run” outputs the type and name of the resource(s) it creates. In 1.2, it now creates a deployment resource. You can use that in subsequent commands, such as "kubectl get deployment ", or "kubectl expose deployment ". If you want to write a script to do that automatically, in a forward-compatible manner, use "-o name" flag with "kubectl run", and it will generate short output "deployments/", which can also be used on subsequent command lines. The "--generator" flag can be used with "kubectl run" to generate other types of resources, for example, set it to "run/v1" to create a Replication Controller, which was the default in 1.1 and 1.0, and to "run-pod/v1" to create a Pod, such as for --restart=Never pods.