Signed-off-by: Kai Kreuzer <kai@openhab.org> |
||
|---|---|---|
| .. | ||
| readme.md | ||
readme.md
| id | label | title | type | description | source | since | logo | install |
|---|---|---|---|---|---|---|---|---|
| homematic | Homematic | Homematic - Bindings | binding | This is the binding for the [eQ-3 Homematic Solution](http://www.eq-3.de/). | https://github.com/openhab/openhab1-addons/blob/master/bundles/binding/org.openhab.binding.homematic/README.md | 1x | images/addons/homematic.png | legacy |
{% include base.html %}
Homematic Binding
This is the binding for the eQ-3 Homematic Solution. This binding allows you to integrate, view, control and configure all Homematic devices in the openHAB environment.
- RF and WIRED devices are supported
- CCU/Homegear variables with synchronisation
- execute programs on the CCU/Homegear
- flexible converter framework which converts every datapoint of all devices
- fast and lightweight BIN-RPC communication.
- quick metadata and value sync with TclRega scripts. If you start openHAB or reload a item file, it only takes some seconds and all items have their states.
- local cache of all metadata and values to prevent unnecessary CCU/Homegear calls.
- alive validation, if no event is received within a specified time, the binding restarts.
- action to send messages to a Homematic remote control with a display
- HomematicIP support. HomematicIP is disabled by default, because if you don't have HM-IP devices, the binding still communicates with BIN-RPC. If you enable HM-IP support, the binding uses XML-RPC. In the binding configuration, set
homematicIP.enabled=true. - Homegear support including variables and programs (Homegear scripts). With Homegear you can control HomeMatic devices without a CCU, MAX! devices without a cube and Philips hue devices, more to come! Note: You need at least 0.5.8 of Homegear.
- BATTERY_TYPE datapoint. Show the type of the battery for every battery-powered Homematic device.
String ... { homematic="address=KEQxxxxxxxx, channel=0, parameter=BATTERY_TYPE" }
- CCU group support. You can group together for example some thermostats and call group datapoints.
Number ... {homematic="address=INT0000001, channel=1, parameter=SET_TEMPERATURE“}
Note: The CCU does not send updates to a group! If you change the temperature manually, you have to write a rule to update the group:
var Timer thermostatChangedTimer = null

rule "Some Thermostat changed"
when
   Item thermostat_l changed or
   Item thermostat_2 changed or
   Item thermostat_3 changed
then
   if (thermostatChangedTimer != null) {
       thermostatChangedTimer.cancel;
       thermostatChangedTimer = null;
   }

   // reschedule timer to cover latest change
   thermostatChangedTimer = createTimer(now.plusSeconds(20)) [|
       sendCommand(thermostat_group, thermostat_1.state)
   ]
end
- Remote control display is now driven via RPC (formerly TclRega script)
- Many small optimizations
- CUxD Support
- XML-RPC removed
- Stand alone actions, use reload_datapoints, reload_variables and reload_rssi without a device binding
- RSSI_DEVICE and RSSI_PEER datapoint. Show the RSSI values from RF devices.
Number RSSI_Livingroom_Device   "RSSI device light livingroom [%d dbm]"   { homematic="address=xxxxxxxx, channel=0, parameter=RSSI_DEVICE" }
Number RSSI_Livingroom_Peer     "RSSI peer light livingroom [%d dbm]"     { homematic="address=xxxxxxxx, channel=0, parameter=RSSI_PEER" }
If you are using Homegear, the values are always up to date. The values from a CCU are fetched during startup. If you want to refresh the CCU values, you need the RELOAD_RSSI action:
Switch Reload_Rssi { homematic="action=reload_rssi" }
Just send a ON command to the Switch and the RSSI values are updated.
Requirements
These ports are used by the binding:
- TclRegaScript (required): 8181
- RF components (required): 2001
- WIRED components (optional): 2000
The CCU firewall must be configured to 'full access' for the Remote Homematic-Script API.
There is also a binding specifically for openHAB 2 here.
Binding Configuration
This binding can be configured in the file services/homematic.cfg.
| Property | Default | Required | Description |
|---|---|---|---|
| host | Yes | Hostname / IP address of the Homematic CCU | |
| callback.host | No | Hostname / IP address for the callback server (optional, default is auto-discovery). This is normally the IP / hostname of the local host (but not "localhost" or "127.0.0.1"). | |
| callback.port | 9123 | No | Port number for the callback server. |
| alive.interval | 300 | No | the interval in seconds to check if the communication with the CCU is still alive. If no message receives from the CCU, the binding restarts. |
| reconnect.interval | No | the interval in seconds to reconnect to the Homematic server (optional, default is disabled). If you have no sensors which sends messages in regular intervals and/or you have low communication, the alive.interval may restart the connection to the Homematic server too often. The reconnect.interval disables the alive.interval and reconnects after a fixed period of time. Think in hours when configuring (one hour = 3600) |
|
| homematicIP.enabled | false | No | Enables CCU2 HomematicIP support. HomematicIP does currently not support BIN-RPC. Therefore it's disabled by default, because if you don't have HM-IP devices, the binding still communicates with BIN-RPC. If you enable HM-IP support, the binding uses XML-RPC. |
Item Configuration
Available parameters:
- address: (datapoint) formerly id, the address of the datapoint, e.g KEQ0048285
- channel: (datapoint) the channel number, e.g. 5
- parameter: (datapoint) the name of the datapoint, e.g. PRESS_SHORT, LEVEL, ...
- variable: (variable) the name of the CCU variable
- program: (program) the name of the CCU program
- forceUpdate: (datapoint, variable) if true, the new value is always sent to the CCU even it's equal the current value
- action: (datapoint, variable, program) execute a action, RELOAD_VARIABLES, RELOAD_DATAPOINTS or RELOAD_RSSI
- delay: (datapoint, variable) delays transmission of a command to the Homematic server (in seconds), eg. 3.5
Datapoint Examples
Dimmer Light_Livingroom "Livingroom [%d %%]" <slider> {homematic="address=JEQ0123456, channel=1, parameter=LEVEL"}
Switch Remote_Key_01 "Remote Key 01" {homematic="address=KEQ0012345, channel=1, parameter=PRESS_SHORT"}
Rollershutter Kitchen_Window  "Kitchen Window [%d %%]" <rollershutter> {homematic="address=KEQ0012345, channel=1, parameter=LEVEL"}
For a window contact, you need a map too:
String Bath_Window "Bath_Window [MAP(window.map):%s]" <contact> {homematic="address=KEQ0123456, channel=1, parameter=STATE"}
CLOSED=closed
OPEN=open
TILTED=tilted
undefined=unknown
A documentation which device is proving which datapoint, please check the documentation from EQ3: Datapoints for CCU1, Datapoints for CCU2
To get the address from Homegear:
sudo homegear -rfamilies select 0devices select centralpeers list
The result should be a table similar to this one, the address needed for OpenHAB is the serial number column in this table:
         ID │ Name                      │  Address │ Serial Number │ Type │ Type String               │ Firmware │ Config Pending │ Unreach
────────────┼───────────────────────────┼──────────┼───────────────┼──────┼───────────────────────────┼──────────┼────────────────┼────────
            │                           │          │               │      │                           │          │                │
          1 │ Hutschiene                │   3840A6 │    MEQ0023488 │ 0061 │              HM-LC-Sw4-DR │      2.4 │             No │      No
────────────┴───────────────────────────┴──────────┴───────────────┴──────┴───────────────────────────┴──────────┴────────────────┴────────
Suitable combinations of channel and parameter name for your device connected via Homegear can be found at device reference page.
Program examples
// binds to the Homematic program 'Testprogram'.
// if you send a ON Command to the Switch, the program starts on the CCU
Switch Prog_Testprogram {homematic="program=Testprogram"}
Variable Examples
// binds to a boolean variable named Holidaymode on the CCU
Switch Var_Holidaymode {homematic="variable=Holidaymode"}

// binds to the INDEX of a valuelist variable (e.g with the values 10;20;30;40;50)
// shows 0 for 10, 1 for 20 ...
Number Var_Autoshade_height "Autoshade height index [%d]" {homematic="variable=Autoshade Height"}

// binds to the VALUE of a valuelist variable (e.g with the values 10;20;30;40;50)
// shows 10, 20 ...
String Var_Autoshade_height "Autoshade height [%s %%]" {homematic="variable=Autoshade Height"}
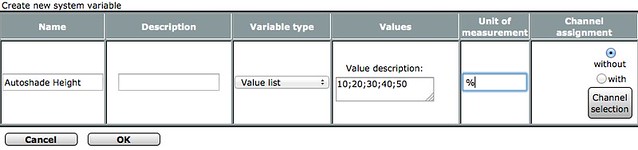
Sitemap for valuelist variables
// if you bound the item to the INDEX with a Number Item
Selection item= Var_Autoshade_height mappings=[0="10", 1="20", 2="30", 3="40", 4="50"]

// if you bound the item to the VALUE with a String Item
Selection item= Var_Autoshade_height mappings=[10="10", 20="20", 30="30", 40="40", 50="50"]
Variable/Datapoint sync
The CCU only sends a message if a datapoint of a device has changed. There is (currently) no way to receive a event automatically when a variable has changed. But there is a solution ... variable sync. This is done with the help of the 'Virtual remote control' feature of the CCU. The CCU supports 50 virtual remote control channels and you can use one of them for variable sync.
Here is an example:
Connect to the CCU WebGui, go to devices, search a free 'Virtual remote control (wireless)' and name it as you want. In my example i use channel 1 with the name 'VK_Reload_Variable':

Now you need an item:
Switch Reload_Variables {homematic="address=BidCoS-RF, channel=1, parameter=PRESS_SHORT, action=RELOAD_VARIABLES"}
The key is the action attribute. The binding reloads all variables and publishes only changes to openHAB if the Switch receives ON. You can do this for example in a rule with a cron trigger to sync the variables in certain intervals. Or you do a manual reload from an App, GreenT, ...
If you want to do a reload immediately when a variable changes, you have to write (click together) a program on the CCU. The if condition checks all the variables you want if they have changed, the Activity is only one: send 'Button press short' to the previously bound 'Virtual remote control', in my example 'VK_Reload_Variable'.

Thats it ... if a variable (in my example Holidaymode) changes, the program starts and sends the 'button press short' to the 'Virtual remote control'. This event is published from the CCU to the binding and sends ON to the item with the action attribute. The binding reloads all variables and publishes the changes to openHAB.
The same you can do with the action RELOAD_DATAPOINTS to reload all datapoints. This is normally not necessary but recommended from time to time. The binding has a local cache of all metadata and values of the CCU. In case openHAB misses an event (event not received correctly, network problem, ...), this local cache and of course your items get stale and needs to be updated. With the action RELOAD_DATAPOINTS you can do this.
In this example i use channel 2 of the 'Virtual remote control'
Switch Reload_Datapoints {homematic="address=BidCoS-RF, channel=2, parameter=PRESS_SHORT, action=RELOAD_DATAPOINTS"}
Just send ON to this Switch and all datapoints refreshes. Only changes are published to openHAB!
You can also use a standalone action without a device binding
Switch Reload_Datapoints {homematic="action=RELOAD_DATAPOINTS"}
Example: reload all datapoints every 6 hours
rule "Reload datapoints"
when
    Time cron "0 0 0/6 * * ?"   // every 6 hours
then
	sendCommand(Reload_Datapoints, ON)
end
forceUpdate
As mentioned earlier, the binding manages a local cache of all metadata and values of the CCU. Lets say you have a rule which is doing something and updates an item bound to a Homematic device. The value is send to the CCU, the CCU sends it to the device and sends back an event to the binding which updates the item. If the new value (State) of an item is the same as the previous value, all this is unnecessary! The default behavior of the binding is to check if a value has changed and only send changed values to the CCU.
Example:
Rollershutter Kitchen_Window "Kitchen Window [%d %%]" <rollershutter> {homematic="address=KEQ0012345, channel=1, parameter=LEVEL"}
If the Rollershutter is down and you send a DOWN to this item, the binding recognize this and does nothing. You can override this with the attribute forceUpdate in the binding.
Rollershutter Kitchen_Window "Kitchen Window [%d %%]" <rollershutter> {homematic="address=KEQ0012345, channel=1, parameter=LEVEL, forceUpdate=true"}
Now, if the Rollershutter is down and you send a DOWN to this item, the binding sends the value to the CCU. You hear the click of the relay in the Homematic device and nothing happens, because the Rollershutter is already down. In some situations it may be useful to always send the value to the CCU.
Delay
You can delay the transmission of a command to the Homematic server for a datapoint or variable. If a command is executed, the command is delayed for the configured time and then executed. If a new command is executed within the delay of the previous command, the previous command is deleted and the new is delayed. This is useful to filter many commands and send only the last to the Homematic server.
Switch Light "Light" {homematic="address=KEQxxxxxx, channel=1, parameter=STATE, delay=3.5"}
If you send a ON to the Switch, the command is delayed for 3.5 seconds. If you send ON, OFF, ON, OFF and each command is within the delay, only the last OFF is sent.
Service alerts
Homematic has two service alerts, unreach and config_pending. For every device, these two datapoints are available at channel 0 and you can bind it to an item. So here is a example which displays the number of unreach devices. But only those which are really unreached. The same you can do with config pending (also in the example) and if the device is battery powered, you can also bind LOWBAT to see if the battery is low.
Items
Group:Number:SUM Unreached     "Unreached devices [%d]"
Group:Number:SUM ConfigPending "Devices with config pending [%d]"

Number Rollershutter_Kitchen_Unreach "Rollershutter Kitchen unreached" (Unreached) {homematic="address=KEQxxxxx, channel=0, parameter=UNREACH"}
Number Light_Livingroom_Unreach      "Light Livingroom unreached"      (Unreached) {homematic="address=JEQxxxxx, channel=0, parameter=UNREACH"}

Number Rollershutter_Kitchen_Pending "Rollershutter Kitchen config pending" (ConfigPending) {homematic="address=KEQxxxxx, channel=0, parameter=CONFIG_PENDING"}
Number Light_Livingroom_Pending      "Light Livingroom config pending"      (ConfigPending) {homematic="address=JEQxxxxx, channel=0, parameter=CONFIG_PENDING"}
Sitemap
sitemap homematic label="Example" {
  Frame label="Status" {
		Text item=Unreached labelcolor=[Unreached>0="red"] valuecolor=[>0="red"]
		Text item=Rollershutter_Kitchen_Unreach labelcolor=[Rollershutter_Kitchen_Unreach==1="red"] visibility=[Rollershutter_Kitchen_Unreach>0]
		Text item=Light_Livingroom_Unreach labelcolor=[Light_Livingroom_Unreach==1="red"] visibility=[Light_Livingroom_Unreach>0]

		Text item=ConfigPending labelcolor=[Unreached>0="red"] valuecolor=[>0="red"]
		Text item=Rollershutter_Kitchen_Pending labelcolor=[Rollershutter_Kitchen_Pending==1="red"] visibility=[Rollershutter_Kitchen_Pending>0]
		Text item=Light_Livingroom_Pending labelcolor=[Light_Livingroom_Pending==1="red"] visibility=[Light_Livingroom_Pending>0]
  }
}
Device Confirmation List
These devices have been tested so far and confirmed as working:
RF
- HM-CC-RT-DN (Electronic Wireless Radiator Thermostat)
- HM-CC-TC (Electronic Wireless Radiator Thermostat)
- HM-TC-IT-WM-W-EU (Wireless Room Thermostat)
- HM-ES-PMSw1-Pl (Wireless Switch Actuator 1-channel with power metering, plug adapter)
- HM-WDS10-TH-O (Outside radio-controlled temperature humidity sensor OTH)
- HM-WDS40-TH-I (Inside radio-controlled temperature humidity sensor IT)
- HM-WDS30-T-O (Outside radio-controlled temperature sensor )
- HM-WDS100-C6-O (Radio-controlled weather data sensor OC3)
- HM-RC-19-B (Radio remote control 19 button)
- HM-PBI-4-FM (Radio push-button interface, 4 channel flush-mount)
- HM-LC-Sw4-PCB (Switching actuator, PCB version)
- HM-LC-Sw4-WM (Switch actuator for wall mounting)
- HM-LC-Dim1T-FM (Radio-controlled dimming actuator 1-channel trailing edge flush-mount)
- HM-LC-Dim1T-Pl (Radio-controlled socket adapter dimming actuator 1-channel trailing edge)
- HM-LC-Dim1T-CV (Radio-controlled dimming actuator 1-channel trailing edge ceiling void mount)
- HM-LC-Dim1PWM-CV (Dimming actuator PWM DC-LED, Dropped Ceiling
- HM-LC-Sw1-Ba-PCB (Switch 1 channel PCB Version, low voltage)
- HM-LC-Sw1-Pl (Radio-controlled socket adapter switch actuator 1-channel trailing edge)
- HM-LC-Sw1-FM (Switch-/blind actuators flush-mount)
- HM-LC-Sw1-SM (Switch-/blind actuators flush-mount)
- HM-LC-Sw2-FM (Switch-/blind actuators flush-mount)
- HM-LC-Sw1PBU-FM (Radio-controlled switching actuator for brand switch systems, 1-channel flush-mount)
- HM-LC-Sw4-Ba-PCB (Switch 4 channel PCB Version, low voltage)
- HM-LC-Sw4-SM (Switch actuator surface-mount)
- HM-LC-Sw4-DR (Radio-controlled switch actuator 4-channel, for mounting on DIN rails)
- HM-LC-Bl1-FM (Switch-/blind actuators flush-mount)
- HM-LC-Bl1-SM (Blind actuators surface-mount)
- HM-LC-Bl1PBU-FM (Radio-controlled blind actuator for brand switch systems, 1-channel flush-mount)
- HM-OU-LED16 (Radio-controlled 16 channel LED Display + push button)
- HM-RC-4-2 (Remote control 4 channels)
- HM-Sen-MDIR-O (Wireless infrared motion detector outdoor)
- HM-Sec-RHS (Radio-controlled window rotary handle sensor)
- HM-Sec-Key-S (KeyMatic)
- HM-Sec-Win (WinMatic)
- HM-Sec-MDIR (Wireless motion detector)
- HM-Sec-SC (Radio-controlled shutter contact)
- HM-Sec-SC-2 (Radio-controlled shutter contact)
- HM-Sec-TiS (Tilt-sensor contact)
- HM-SCI-3-FM (Radio shutter contact interface 3-channel, flush-mount)
- HM-CC-VD (Radio-controlled valve drive)
- HM-PB-6-WM55 (Wireless push button 6 channel)
- HM-RC-12 (Radio remote control 12 button)
- HM-RC-Key3 (KeyMatic remote control)
- HM-PB-4Dis-WM (Radio push-button 4-gang with display)
- HM-Sec-SD (Radio-controlled smoke detector)
- ZEL STG RM FFK (a HM-Sec-SC-2 from Rotomatic)
- HM-Sec-SCo (Radio-controlled shutter contact optical)
Wired
- HMW-Sen-SC-12-FM (RS485 12-channel shutter contact for flush mounting)
- HMW-Sen-SC-12-DR (RS485 12-channel shutter contact for mounting on DIN rails)
- HMW-IO-12-Sw7-DR (RS485 I/O module 12 inputs 7 switch outputs for mounting on DIN rails)
- HMW-LC-Dim1L-DR (Switch/dimming actuator, blind actuator Wired bus for mounting on DIN rails)
- HMW-IO-12-Sw14-DR (RS485 I/O-Modul 12 inputs 14 switch output for mounting on DIN rails)
MAX! devices (via Homegear)
- BC-SC-Rd-WM (Radio-controlled shutter contact)
- BC-SC-Rd-WM-2 (Radio-controlled shutter contact)
- BC-RT-TRX-CyG-3 (Electronic Wireless Radiator Thermostat)
Troubleshooting
SHORT & LONG_PRESS events of push buttons do not occur on the event bus
It seems buttons like the HM-PB-2-WM55 do just send these kind of events to the CCU if they are mentioned in a CCU program. A simple workaround to make them send these events is, to create a program (rule inside the CCU) that does just have a "When" part and no "Then" part, in this "When" part each channel needs to be mentioned at least once.
As the HM-PB-2-WM55 for instance has two channels, it is enough to mention the SHORT_PRESS event of channel 1 & 2. The LONG_PRESS events will work automatically as they are part of the same channels.
After the creation of this program, the button device will receive configuration data from the CCU which have to be accepted by pressing the config-button at the back of the device.
INSTALL_TEST
If a button is still not working and you do not see any PRESS_LONG / SHORT in your log file (loglevel DEBUG), it could be because of enabled security. Try to disable security of your buttons in the HomeMatic Web GUI and try again. If you can't disable security try to use key INSTALL_TEST which gets updated to ON for each key press
No BinX signature / BadRequestException Binsystem.multicall
If you change the communication mode in services/homematic.cfg (rpc property), one of these exceptions may appear if you restart openHAB:
rpc=bin -> No BinX signature
rpc=xml -> BadRequestException: Binsystem.multicall
The binding registers itself with the CCU at startup with the specified communication mode. If you shutdown openHAB (or kill it) and the binding cannot unregister successfully from the CCU, the CCU still sends messages. It does this for about three minutes, if there is no answer, it gives up. If you start openHAB in this period of time with another communication mode, these exceptions occur.
Just wait untill the exceptions disappear and restart openHAB. This happens only after switching the communication mode.
Debugging and Tracing
Enable DEBUG or TRACE for the logger named org.openhab.binding.homematic.
Can't find DatapointConfig
I assume, the binding is installed.
- In the openHab logfile there must be a entry like this:
HomematicConfig[host=...,callbackHost=...,callbackPort=...,aliveInterval=...,rpc=bin]
If this entry does not exist, there is a problem in your services/homematic.cfg file. A common problem is a space in front of the config properties.
-
If 'Can't find DatapointConfig' still exists, switch the binding to DEBUG mode, start openHab and wait for or trigger an event from the device. Now you see the datapoints for every event. Compare your binding in your item file with the datapoint config from the event.
-
If the message still occurs, there might be an unsupported datapoint. Switch the binding to TRACE mode, start openHab, create a issue in the openHab forums and post the logfile and your item file. If you don't want the files to be public, you can send them directly to me at gerrieg.openhab@icloud.com
Video
-
How to control a homematic roller shutter with an EnOcean Rocker
-
How to control a homematic dimmer with an EnOcean Rocker (OnOff Profile)
How to use homematic door contact sensors
/* OLD Configuration */
Contact corFrontDoor "Front Door [%s]" <frontdoor> (gRCor, gLock) { homematic="HEQ0358465:1#STATE" }

/* New Configuration */
Contact corFrontDoor "Front Door [%s]" <frontdoor> (gRCor, gLock) {homematic="address=HEQ0358465, channel=1, parameter=STATE" }

Text item=corFrontDoor
How to use homematic window contact sensors
Number lrWindowRight "Window Right [MAP(contact.map):%d]" <contact> (gRLvng) { homematic="IEQ0203214:1#STATE" }
Text item=lrWindowRight
transform/contact.map:
0=CLOSED
1=TILTED
2=OPEN
-=UNKNOWN
How to read Homematic heater valve state
Dimmer lrHeaterRight "Heater Right [%d %%]" <heating> (gRLvng)  { homematic="IEQ0537568:1#VALVE_STATE" }
Text item=lrHeaterRight
How to use Homematic temperature regulator
Number lrTempSet "Target Temperature [%d °C]" <temperature> (gRLvng, gRBed) { homematic="IEQ0053616:2#SETPOINT" }
Setpoint item=lrTempSet step=0.5 minValue=15 maxValue=30
How to configure Homematic light switch
Switch brLightCeil "Ceiling" (gRBed, gLight) { homematic="IEQ0001542:1#STATE" }
Switch item=brLightCeil
How to configure Homematic temperature and humidity sensor
Number lrTemp "Current Temp [%.1f °C]" <temperature> (gRLvng, gWthrDta) { homematic="IEQ0053616:1#TEMPERATURE" }
Number lrHumid "Humidity [%d %%]" <waterdrop> (gRLvng, gWthrDta) { homematic="IEQ0053616:1#HUMIDITY" }

Text item=lrTemp
Text item=lrHumid
How to configure Homematic motion and brightness sensors
/* OLD Configuration */
Switch corMotion "Motion Detected" (gRCor) { homematic="GEQ0128171:1#MOTION" }
Number corBright "Brightness [%.1f %%]" (gRCor) { homematic="GEQ0128171:1#BRIGHTNESS" }

/* New Configuration */
Switch corMotion "Motion Detected" (gRCor) {homematic="address=GEQ0128171, channel=1, parameter=MOTION" }
Number corBright "Brightness [%.1f %%]" (gRCor) {homematic="address=GEQ0128171, channel=1, parameter=BRIGHTNESS" }

Switch item=corMotion
Text item=corBright
I don't like that the motion switch is "writeable". Maybe someone can post a proper rendering object for the motion detector.
How to control a homematic roller shutter with an EnOcean Rocker
Item
Rollershutter Blinds_Left <rollershutter> (Shutters) {homematic="id=JEQXXXXXX, channel=1, parameter=LEVEL", enocean="{id=00:00:00:00, eep=F6:02:01}"}
How to control a homematic dimmer with an EnOcean Rocker (OnOff Profile)
Item:
Dimmer Lights_Left <lights> (Lights) {homematic="id=GEQXXXXXX, channel=2, parameter=LEVEL", enocean="{id=00:00:00:00, channel=A, eep=F6:02:01}"}}
Homematic Configuration XML File
To be able to configure the converter and available parameter of a homematic device, xml files are used. They are optional, not necessary. Some devices don't work properly without (rollershutter).
There is one device per file.
The config file have to be included inside the distribution (org.openhab.binding.homematic/src/main/resources/devices) and they have to be instatiated at the HomematicBinding constructor.
A better and easier way of adding these files is always welcome!
Structure
Each file has one device element. Each device has several channel elements (the channel name is ignored at the moment).
Each channel contains multiple parameters, which are the same value as you would configure in your item config (e.g. LEVEL, STATE, TEMPERATURE etc).
The parameter of a device can be found in the http://www.eq-3.de/Downloads/PDFs/Dokumentation_und_Tutorials/HM_Script_Teil_4_Datenpunkte_1_503.pdf (or newer versions of that file).
For each parameter there can be a number of converters for a homematic type (like PercentType, OpenClosedType, etc). The converter is given by FQN (full qualified name).
Available Converter
- BooleanOnOffConverter.java
- BooleanOpenCloseConverter.java
- BrightnessConverter.java
- BrightnessIntegerDecimalConverter.java
- DoubleDecimalConverter.java
- DoubleOnOffConverter.java
- DoublePercentageConverter.java
- DoubleUpDownConverter.java
- IntegerDecimalConverter.java
- IntegerOnOffConverter.java
- IntegerOpenClosedConverter.java
- IntegerPercentageOnOffConverter.java
- IntegerPercentageOpenClosedConverter.java
- IntegerPercentConverter.java
- InvertedBooleanOpenCloseConverter.java
- InvertedDoubleOpenClosedConverter.java
- InvertedDoublePercentageConverter.java
- InvertedDoubleUpDownConverter.java
- NegativeBooleanOnOffConverter.java
- StateCommandConverter.java
- TemperatureConverter.java
These converters can also be given at the item config with parameter "converter".
XML Schema
<?xml version="1.0" encoding="UTF-8"?>
<schema xmlns="http://www.w3.org/2001/XMLSchema" targetNamespace="http://www.example.org/device" xmlns:tns="http://www.example.org/device" elementFormDefault="qualified">

    <element name="device" type="tns:DeviceType"></element>

    <complexType name="DeviceType">
        <sequence>
            <element maxOccurs="unbounded" type="tns:ChannelType"></element>
        </sequence>
        <attribute name="name" type="string" />
        <attribute name="type" type="string" />
    </complexType>

    <complexType name="ChannelType">
        <sequence>
            <element maxOccurs="unbounded" name="parameter" type="tns:ParameterType"></element>
        </sequence>
        <attribute name="name" type="string"></attribute>
    </complexType>

    <complexType name="ParameterType">
        <sequence>
            <element maxOccurs="unbounded" type="tns:ConverterType" />
        </sequence>
        <attribute name="name" type="string"></attribute>
    </complexType>

    <complexType name="ConverterType">
        <sequence>
            <element name="className">
                <simpleType>
                    <restriction base="string"></restriction>
                </simpleType>
            </element>
        </sequence>
        <attribute name="forType" type="string"></attribute>
    </complexType>
</schema>
Example
<?xml version="1.0" encoding="UTF-8"?>
<device name="HM-LC-Bl1PBU-FM" type="rollershutter">
    <channel name="0">
        <parameter name="UNREACH">
            <converter forType="OnOffType">
                <className>org.openhab.binding.homematic.internal.converter.state.BooleanOnOffConverter</className>
            </converter>
        </parameter>
    </channel>
    <channel name="1">
        <parameter name="LEVEL">
            <converter forType="PercentType">
                <className>org.openhab.binding.homematic.internal.converter.state.InvertedDoublePercentageConverter</className>
            </converter>
            <converter forType="OpenClosedType">
                <className>org.openhab.binding.homematic.internal.converter.state.InvertedDoubleOpenClosedConverter</className>
            </converter>
            <converter forType="UpDownType">
                <className>org.openhab.binding.homematic.internal.converter.state.InvertedDoubleUpDownConverter</className>
            </converter>
        </parameter>
        <parameter name="STOP">
            <converter forType="OnOffType">
                <className>org.openhab.binding.homematic.internal.converter.state.NegativeBooleanOnOffConverter</className>
            </converter>
        </parameter>
    </channel>
</device>
Hardware
Controller
The controller "speaks" with the HomeMatic devices through the properiatry wireless protocol of HomeMatic.
CCU 1
The best supported hardware so far for HomeMatic is the CCU 1.
CCU 2
The second version (beginning with mid 2013) should work in most circumstances, but is not as widely used as the first version. We need testers here: If you own a CCU2, please try out the latest 1.4.0 nightly releases!
LAN Adapter
One of the cheaper alternatives is to use the HomeMatic LAN Adapter.
The LAN Adapter requires the BidCos-Service running and listening on a specific port in your LAN. As of this writing the BidCos-Service is only available for Microsoft Windows. If you want to run the BidCos-Service 'natively' (through Qemu) on Linux without messing around with Wine follow these step by step instructions.
-
Install QEMU (If you are running OpenHAB on i386/amd64)
In order to run the BidCos-Service daemon 'rfd' under linux you need to install the QEMU arm emulation. If you are using Debian you have to install at least the package qemu-system-arm.
apt-get install qemu -
Download the latest CCU 2 firmware from eQ-3 homepage
-
Extract the downloaded firmware e.g. HM-CCU2-2.7.8.tar.gz
mkdir /tmp/firmware
tar xvzf HM-CCU2-2.7.8.tar.gz -C /tmp/firmware
You should now have three files under the directory /tmp/firmware
rootfs.ubi (<-- this is the firmware inside a UBIFS iamge) uImage update_script -
Create an 256 MiB emulated NAND flash with 2KiB NAND page size
modprobe nandsim first_id_byte=0x20 second_id_byte=0xaa third_id_byte=0x00 fourth_id_byte=0x15You should see a newly created MTD device /dev/mtd0 (assume that you do not have other MTD devices)
-
Copy the contents of the UBIFS image rootfs.ubi to the emulated MTD device
dd if=rootfs.ubi of=/dev/mtd0 bs=2048 -
Load UBI kernel module and attach the MTD device mtd0
modprobe ubi mtd=0,2048 -
Mount the UBIFS image
mkdir /mnt/ubifs mount -t ubifs /dev/ubi0_0 /mnt/ubifs -
Copy the required files to run the BidCos-Service from the UBIFS image
mkdir -p /etc/eq3-rfd /opt/eq3-rfd/bin /opt/eq3-rfd/firmware
cd /mnt/ubifs
cp /mnt/ubifs/bin/rfd /opt/eq3-rfd/bin
cp /mnt/ubifs/etc/config_templates/rfd.conf /etc/eq3-rfd/bidcos.conf
cp -r /mnt/ubifs/firmware/* /opt/eq3-rfd/firmware/
List the dependencies for rfd binary
qemu-arm -L /mnt/ubifs /mnt/ubifs/lib/ld-linux.so.3 --list /mnt/ubifs/bin/rfdYou should see an output like this
libpthread.so.0 => /lib/libpthread.so.0 (0xf67a7000)
libelvutils.so => /lib/libelvutils.so (0xf6786000)
libhsscomm.so => /lib/libhsscomm.so (0xf6733000)
libxmlparser.so => /lib/libxmlparser.so (0xf6725000)
libXmlRpc.so => /lib/libXmlRpc.so (0xf66fc000)
libLanDeviceUtils.so => /lib/libLanDeviceUtils.so (0xf66d2000)
libUnifiedLanComm.so => /lib/libUnifiedLanComm.so (0xf66bf000)
libstdc++.so.6 => /usr/lib/libstdc++.so.6 (0xf65e8000)
libm.so.6 => /lib/libm.so.6 (0xf6542000)
libc.so.6 => /lib/libc.so.6 (0xf63f7000)
libgcc_s.so.1 => /lib/libgcc_s.so.1 (0xf63ce000)
/lib/ld-linux.so.3 => /mnt/ubifs/lib/ld-linux.so.3 (0xf6fd7000)
Copy all the listed libs from /mnt/ubifs to there respective folder at /opt/eq3-rfd
-
Create a system user and adjust permissions
adduser --system --home /opt/eq3-rfd --shell /bin/false --no-create-home --group bidcos chown -R bidcos:bidcos /opt/eq3-rfd -
Edit and adjust the BidCos-Service configuration bidcos.conf
# TCP Port for XmlRpc connections Listen Port = 2001 # Log Level: 1=DEBUG, 2=WARNING, 3=INFO, 4=NOTICE, 5=WARNING, 6=ERROR Log Level = 3 # If set to 1 the AES keys are stored in a file. Highly recommended. Persist Keys = 1 Address File = /etc/eq3-rfd/ids Key File = /etc/eq3-rfd/keys Device Files Dir = /etc/eq3-rfd/devices # These path are relative to QEMU_LD_PREFIX Device Description Dir = /firmware/rftypes Firmware Dir = /firmware Replacemap File = /firmware/rftypes/replaceMap/rfReplaceMap.xml # Logging Log Destination = File Log Filename = /var/log/eq3-rfd/bidcos.log [Interface 0] Type = Lan Interface Serial Number = <HomeMatic ID e.g. JEQ0707164> Encryption Key = <your encryption key> -
Start the BidCos-Service daemon 'rfd'
The BidCos-Service daemon 'rfd' can now be started with the following command
qemu-arm -L /opt/eq3-rfd /opt/eq3-rfd/bin/rfd -f /etc/eq3-rfd/bidcos.conf
CUL
The other cheaper alternative is the CUL stick. The CUL is an USB stick that can be used as a wireless transceiver. It ca be programmed to be used with a hughe amount of wireless protocols, under which you can find the homemtic protocol as well. Since the CUL is not natively supported by the binding, you need a program to translate the CUL data to the CCU XML RPC interface: Homegear
We have reports from users that succesfully use both for their homemtic devices. Apparently security is still not supported.
There are two admin items available to gather more information about devices in the CCU
Introduction
For devices not supported by the homematic binding, we needed a mechanism to get all available information about them. To make it easy for the user there exist two virtual items, the admin items.
Admin Items
There are two admin items available in the homematic binding.
Dump unconfigured devices
This is mainly intended to give users an idea on how to configure their devices. It will print out various information about all devices that are not configured (say exist in an items file).
In future we try to print out a fully working items file line to be just copied into your file and done.
Example
String AdminDumpUnconfigured "something" <rollershutter> {homematic="admin=DUMP_UNCONFIGURED_DEVICES"}
Use the Admin Items
If you are looking for a specific device info, please make sure that it does not exist in your items files.
- add a new device with with the admin item (see above)
- send the following command (e.g. through OSGI console or through XMPP) to OpenHAB:
openhab send AdminDumpUnconfigured list - Copy the information from the logfile and attach it to the new device request
How to create a new Device Request
We need as much as possible information about a device to support it. The best starting point is of course to copy the device dump gathered with the help of the "Dump unconfigured devices" admin item. If the device is an sensor we would like to have the log line where it prints out the new value received from it. E.g. if you have a button, please press it and copy the log line appearing. Or if it is a sensor, please wait until the sensor sends an update to the CCU, that will be written into the logfile as well.
With this information, please add a new issue of type / template device request.